I finally found time to write a review of Friendship Bread: A Novel today. Since starting my externship for school two weeks ago, I haven't had much time to blog. I thought I would share the review on here as well. I truly loved the book and highly recommend it.
Once in a blue moon, a novel comes along that reaches down deep and touches your soul. Friendship Bread: A Novel is indeed that book.
Typically, I prefer to read "lighter, fluffier" sorts of books. I'm more of a romantic-comedy kind of girl and don't often venture into dramatic pieces. I'm thankful that I made an exception for Friendship Bread.
From the moment I opened the beautiful book, I didn't want to put it down. It takes you on an emotion filled journey and tugs on your heart-strings in unexpected ways. The characters all have their own unique story lines, but Darien does a wonderful job of weaving them all together into a heart-felt message of encouragement and hope.
Whether you are a fan/avid baker of Amish Friendship Bread already or have simply heard rumors of this mysterious chain-letter type goodie, you owe it to yourself to read this book. You will laugh. You will cry. You will have a serious craving for desserts. Most importantly, you will be reminded of what really matters in life. Love, Hope, Friendship & of course Bread.
For those who have never baked Amish Friendship Bread (but will most certainly want to after reading the book), will find recipes at the back of the book including the Starter recipe, Traditional recipe and a variety of variations. You'll be hooked on the bread in no time!
This is a book that you will want to share with friends and family. It's a perfect Book Club choice. Pass it and a loaf of Amish Friendship Bread on to a friend and watch the magic happen.
Saturday, April 23, 2011
Saturday, April 16, 2011
My Real World & Bake Day
I finally have a moment to catch my breath and blog. Life has proven to be rather hectic the past two weeks. I finished up my classes at school and then turned around and started my 5-week externship program.
It's been quite awhile since I have worked a normal 9-5 work day. Let's just say that it kicked my booty this past week. I came home everyday feeling beat down. It didn't help that my sinuses/allergies were out of whack a couple of days. Sinus pressure and pain makes for a LONG day. I haven't even checked Twitter in the past week and have barely touched Facebook.
Next week should flow a little more smoothly. My body and mind are starting to adjust to the new schedule. At times, I really miss being done with my day at noon. Going to school was a nice little gig.
Thankfully, my Bake Day didn't fall during the middle of the week. Somehow, it worked out to be today. YAY! I was eager to get into the kitchen and work on a project for The Friendship Bread Kitchen. The theme this time around is a Savory recipe incorporating Friendship Bread Starter. I love a good challenge.
I gave it a lot of thought and decided to create Garlic Parmesan Friendship Biscuits. Garlic and Parmesan are two of my favorite ingredients to use while cooking. Plus, they make the kitchen smell so tasty that you almost want to lick the air.
 Here's my lovely & perky Starter before the magic happens.
 Here are the beautiful wet ingredients (including 1 cup of Starter). I love the color of Egg Yolk.
 These little gems are ready to sit for 30 minutes and rise.

And the finish product. Yummy! You can see the shredded parmesan baked into the biscuit.
 Slice one open & it's ready to eat. This was taste-tested by the Hubby & passed the test!
It's been quite awhile since I have worked a normal 9-5 work day. Let's just say that it kicked my booty this past week. I came home everyday feeling beat down. It didn't help that my sinuses/allergies were out of whack a couple of days. Sinus pressure and pain makes for a LONG day. I haven't even checked Twitter in the past week and have barely touched Facebook.
Next week should flow a little more smoothly. My body and mind are starting to adjust to the new schedule. At times, I really miss being done with my day at noon. Going to school was a nice little gig.
Thankfully, my Bake Day didn't fall during the middle of the week. Somehow, it worked out to be today. YAY! I was eager to get into the kitchen and work on a project for The Friendship Bread Kitchen. The theme this time around is a Savory recipe incorporating Friendship Bread Starter. I love a good challenge.
I gave it a lot of thought and decided to create Garlic Parmesan Friendship Biscuits. Garlic and Parmesan are two of my favorite ingredients to use while cooking. Plus, they make the kitchen smell so tasty that you almost want to lick the air.


And the finish product. Yummy! You can see the shredded parmesan baked into the biscuit.

Garlic Parmesan Friendship Biscuits
Ingredients:
1 cup Amish Friendship Bread starter
2 eggs, beaten
¼ cup oil
¼ stick butter, melted
2 cups flour
½ teaspoon baking soda
½ teaspoon salt
2 teaspoons baking powder
2 eggs, beaten
¼ cup oil
¼ stick butter, melted
2 cups flour
½ teaspoon baking soda
½ teaspoon salt
2 teaspoons baking powder
½ cup parmesan cheese (grated or shredded)
2 cloves of garlic (freshly minced)
1 tsp garlic powder (add to melted butter)
Directions
- Preheat over to 325° F (165° C).
- Combine all wet ingredients except butter in a medium-size bowl.
- Combine all dry ingredients (minus the cheese & garlic) in a larger bowl and make a well in the center.
- Pour the wet ingredients into the well and whisk until the dough begins to pull away from the sides of the bowl.
- Add cheese & garlic to the dough and mix in to distribute evenly
- Transfer dough mixture to a lightly-floured surface and roll (or pat with your hands) to 1/2-inch thickness.
- Using a 3-inch round cookie cutter, cut out biscuits and place on lightly greased cookie sheet.
- Brush the tops of the biscuits with melted butter. Cover loosely with oiled plastic wrap and let rise for 30 minutes.
- Bake for 15-20 minutes, removing when the tops are lightly browned. Serve immediately.
- Enjoy!
Thursday, April 7, 2011
Bake Day & FInal Exams
Today was my last round of Final Exams for school. I will be starting my 5-week externship on Monday morning. School has been an intense experience, but I felt good after completing my finals this morning.
How did I choose to celebrate? I baked! After all, today is also Day 10 for my Friendship Bread Starter. The question was "What am I going to bake?" I knew that I wanted to make some yummy treats to give as little "thank you" gifts to a few of my instructors tomorrow. They've already experienced the traditional bread version. So, I ruled that out right away. After some deliberating, I chose to try my hand at Friendship Biscotti.
Let the baking adventure begin...
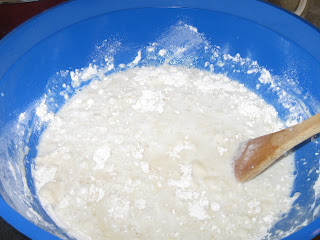 I love my Big Blue Bowl. It makes mixing up the new batches of Starters more manageable. I don't end up wearing nearly as much flour.
 Here's my lovely little Starter back in it's jar. It's ready for another 10 Days of hanging out on the counter.
 These may not look appetizing now, but just you wait...
 Ta Da! How good does that look?
 This is how they looked after they took another trip to the oven. If you're wondering, the Biscotti has Dried Cranberries & Chopped Nuts in it.
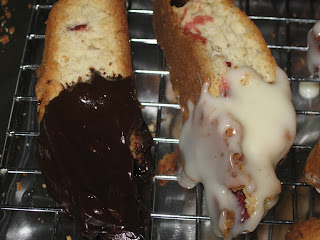 The end product - Chocolate Dipped Cranberry Nut Friendship Biscotti
RECIPE:
Prep Time: 15 minutes
Cook Time: 45 minutes
Servings: 24
Yield: 24 pieces
Ingredients
Directions
How did I choose to celebrate? I baked! After all, today is also Day 10 for my Friendship Bread Starter. The question was "What am I going to bake?" I knew that I wanted to make some yummy treats to give as little "thank you" gifts to a few of my instructors tomorrow. They've already experienced the traditional bread version. So, I ruled that out right away. After some deliberating, I chose to try my hand at Friendship Biscotti.
Let the baking adventure begin...


RECIPE:
Chocolate Dipped Cranberry Nut Friendship Biscotti
Cook Time: 45 minutes
Servings: 24
Yield: 24 pieces
Ingredients
1 cup Amish Friendship Bread starter
2/3 cup granulated sugar
2/3 cup granulated sugar
½ cup butter, softened
1 teaspoon vanilla
1 egg
3 cups flour
1 teaspoon baking powder
1/2 teaspoon salt
1 teaspoon vanilla
1 egg
3 cups flour
1 teaspoon baking powder
1/2 teaspoon salt
¾ cup finely chopped nuts
¾ cup dried cranberries
Ingredients (for Chocolate Icing)
1 cup Semi-Sweet Chocolate Chips
½ cup Heavy Cream
- Preheat oven to 350° F (175° C).
- In medium bowl, cream together starter, sugar and butter. Stir in vanilla extract and egg.
- In another bowl combine flour, baking powder and salt. Stir into creamed mixture. Fold in nuts and cranberries
- Divide dough into 2 pieces. Roll each piece out into a log about 10 inches long. Place them on ungreased cookie sheet and flatten until they are about 3 inches wide.
- Bake for 30-35 minutes, until firm. Cool on baking sheet for 10-15 minutes.
- Slice logs crosswise into 1/2 inch wide slices. Place slices cut side down on baking sheet.
- Return to oven for additional 15 minutes, until crisp and light brown. Cool til ready to dip.
- While cooling, melt chocolate chips and heavy cream over double boiler until smooth.
- Dip one end into the chocolate or spread on thin layer with knife and allow to dry.
- Store in air tight container
- ENJOY!
Tuesday, April 5, 2011
Hot Off The Presses!
If you're in the mood to read a book that will tug on your heart strings and feed your soul, then you need to grab a copy of Friendship Bread - The Novel by Darien Gee.

I have been fortunate enough to become acquainted with Darien after stumbling across The Friendship Bread Kitchen page on Facebook. I have always been a fan of Amish Friendship Bread and was eager to rekindle my love for this "magical" bread. My time is well-spent in the Kitchen concocting new variations of this beloved treat every 10 days.
The Novel has been receiving rave reviews across the internet. Darien is going on tour and if you're anywhere near the cities on her list you should definitely make an effort to go to a signing. If you're new to Friendship Bread, you'll be in for quite a treat.
If you'd like to learn more about Amish Friendship Bread and see what all the buzz is about, head on over to The Friendship Bread Kitchen. The pictures alone will have you drooling and chomping at the bit to make this bread!
I know I'm looking forward to my Bake Day this week!
Monday, April 4, 2011
C = Chocolate Crepes
Here I was talking about crepes yesterday and what appears in my Inbox this afternoon? It's a Taste of Home recipe for Chocolate Fruit Crepes. Okay, I was actually talking/thinking about traditional crepes but who in their right mind would pass up CHOCOLATE crepes? Seriously.

Look at the Yumminess!!!! These crepes are filled with peaches & cherries. Personally, I think I'd fill them with strawberries & bananas. I'm salivating at the thought.
Chocolate Fruit Crepes
Look at the Yumminess!!!! These crepes are filled with peaches & cherries. Personally, I think I'd fill them with strawberries & bananas. I'm salivating at the thought.
Chocolate Fruit Crepes
- 10 Servings
- Prep: 30 min. + chilling Cook: 5 min./batch
Ingredients
- 1-1/2 cups buttermilk
- 3 eggs
- 3 tablespoons butter, melted
- 1 cup all-purpose flour
- 2 tablespoons sugar
- 2 tablespoons baking cocoa
FILLING:- 1 can (21 ounces) cherry pie filling
- 1 can (8-1/2 ounces) sliced peaches, drained and chopped
- 1/2 teaspoon ground cinnamon
- 1/8 teaspoon almond extract
- 1/3 cup hot fudge ice cream topping, warmed
- Whipped cream, optional
Directions
- In a large bowl, combine the buttermilk, eggs and butter. Combine the flour, sugar and cocoa; add to buttermilk mixture and mix well. Cover and refrigerate for 1 hour.
- Heat a lightly greased 8-in. nonstick skillet over medium heat; pour 2 tablespoons batter into the center of skillet. Lift and tilt pan to coat bottom evenly. Cook until top appears dry; turn and cook 15-20 seconds longer. Remove to a wire rack. Repeat with remaining batter, greasing skillet as needed. When cool, stack crepes with waxed paper or paper towels in between.
- In a microwave-safe bowl, combine the pie filling, peaches and cinnamon. Microwave, uncovered, on high for 3-4 minutes or until heated through, stirring once. Stir in extract. Spoon 2 tablespoons filling down the center of each crepe. Fold sides of crepe over filling. Drizzle with ice cream topping and garnish with whipped cream if desired. Yield: 10 servings.
Nutrition Facts: 2 filled crepes (calculated without whipped cream) equals 241 calories, 6 g fat (3 g saturated fat), 74 mg cholesterol, 109 mg sodium, 41 g carbohydrate, 1 g fiber, 5 g protein.
Sunday, April 3, 2011
Who Knew Moo Shu?

This was my Moo Shu (Shoo) Chicken last night. Hubby and I went to dinner at our favorite little Chinese restaurant in the area. I had never tried their Moo Shu and was looking for something that wouldn't be as "bad" for my diet as their combo plates (which are LOADED with yummy but fattening foods).
I wasn't expecting them to be so large. I've had Moo Shu in the past at various restaurants, but they've traditionally been smaller. That picture doesn't include the one I already had on my plate! I ate one plus a cup of Wonton Soup and was full. I brought the rest home as leftovers.
The server wasn't kidding when he referred to them as "Chinese Burritos". It appears they use a very thin flour tortilla as opposed to crepes. I don't begrudge them that since tortillas are a staple food here in the Southwest. It just caught me off-guard.
It was quite tasty and I'm confident that I will order them again. I may even have to try and make them at home sometime. If I do, I will also try my hand at making crepes. Tortillas work well, but I prefer a smaller version.
If anyone has a recipe, feel free to share it.
Saturday, April 2, 2011
Z is for Zeppole
This morning, I woke up with a craving for fresh piping-hot Zeppoles. Have you ever craved a food from the moment you arise til the moment you fall back in bed that night? I could easily devour an entire plate of Zeppoles at this moment.
Unfortunately, this chubby girl has been trying to shed a few pounds and is resisting temptation. I guess I shouldn't say "unfortunately". It shows will and determination to not give into my craving, but boy am I tempted. My waistline will thank me later. My foodie heart may not forgive me. Damn if I do. Damn if I don't.
I was introduced to these tasty little delights while dining at a local Pizzeria. I describe them as an Italian version of doughnut holes only lighter. They are best served fresh out of the oil and dusted in powdered sugar and freshly grated lemon zest. My mouth is salivating at the thought of them.

This is an image of Giada De Laurentis's version of Zeppoles via The Food Network. Here is her recipe.
In a medium saucepan combine the butter, salt, 3 tablespoons of sugar, and water over medium heat. Bring to a boil. Take pan off the heat and stir in the flour. Return pan to the heat and stir continuously until mixture forms a ball, about 3 to 5 minutes. Transfer the flour mixture to a medium bowl. Using an electric hand mixer on low speed, add eggs, 1 at a time, incorporating each egg completely before adding the next. Beat until smooth. If not frying immediately, cover with plastic wrap and reserve in the refrigerator.
Meanwhile, pour enough oil into a large frying pan to reach a depth of 2 inches. Heat the oil over medium heat until a deep-fry thermometer registers 375 degrees F.
Using a small ice-cream scooper or 2 small spoons, carefully drop about a tablespoon of the dough into the hot olive oil, frying in batches. Turn the zeppole once or twice, cooking until golden and puffed up, about 5 minutes.
Drain on paper towels. Toss with cinnamon-sugar. Arrange on a platter and serve immediately.
You'll have a party in your mouth devouring these delicious bites of heaven on a plate! Enjoy one for me while you're at it.
Unfortunately, this chubby girl has been trying to shed a few pounds and is resisting temptation. I guess I shouldn't say "unfortunately". It shows will and determination to not give into my craving, but boy am I tempted. My waistline will thank me later. My foodie heart may not forgive me. Damn if I do. Damn if I don't.
I was introduced to these tasty little delights while dining at a local Pizzeria. I describe them as an Italian version of doughnut holes only lighter. They are best served fresh out of the oil and dusted in powdered sugar and freshly grated lemon zest. My mouth is salivating at the thought of them.
This is an image of Giada De Laurentis's version of Zeppoles via The Food Network. Here is her recipe.
Ingredients
- 1 vanilla bean
- 1/2 cup sugar, plus 3 tablespoons
- 2 tablespoons ground cinnamon
- 1 stick butter
- 1/4 teaspoon salt
- 1 cup water
- 1 cup all-purpose flour
- 4 eggs
- Olive oil, for frying
Directions
Cut open the vanilla bean lengthwise. Using the back of a knife, scrape along the inside of the vanilla bean to collect the seeds. Scrape vanilla bean seeds into a small bowl. Add the 1/2 cup sugar and cinnamon and stir to combine. Set aside.In a medium saucepan combine the butter, salt, 3 tablespoons of sugar, and water over medium heat. Bring to a boil. Take pan off the heat and stir in the flour. Return pan to the heat and stir continuously until mixture forms a ball, about 3 to 5 minutes. Transfer the flour mixture to a medium bowl. Using an electric hand mixer on low speed, add eggs, 1 at a time, incorporating each egg completely before adding the next. Beat until smooth. If not frying immediately, cover with plastic wrap and reserve in the refrigerator.
Meanwhile, pour enough oil into a large frying pan to reach a depth of 2 inches. Heat the oil over medium heat until a deep-fry thermometer registers 375 degrees F.
Using a small ice-cream scooper or 2 small spoons, carefully drop about a tablespoon of the dough into the hot olive oil, frying in batches. Turn the zeppole once or twice, cooking until golden and puffed up, about 5 minutes.
Drain on paper towels. Toss with cinnamon-sugar. Arrange on a platter and serve immediately.
You'll have a party in your mouth devouring these delicious bites of heaven on a plate! Enjoy one for me while you're at it.
Subscribe to:
Posts (Atom)